May 24, 2014

"Playa" Bracelet Instructions & Sneak Preview of our upcoming Summer Series!


It's Summertime... and these projects are breezy!...

We've been busy little bees at Beadshop.com these past few weeks creating what Janice calls, "Sun Jewelry." 
What is Sun Jewelry? 
"...that bracelet or necklace worn all summer…in the water, at the beach, wherever! By summer’s end the leather will be all worn and old from too much water, too much sand, too much fun…but, it will be the best (piece) that never left your side…holding secrets and wonderful memories…”
It all started with the "Tahoe Bracelet" that Janice created last Summer. The idea of grabbing some leather, a clasp, a few treasured beads and fashioning a bracelet that would be your best friend throughout the Summer, distressed by exposure to the elements and rich with fun-filled memories by season's end inspired a movement. 

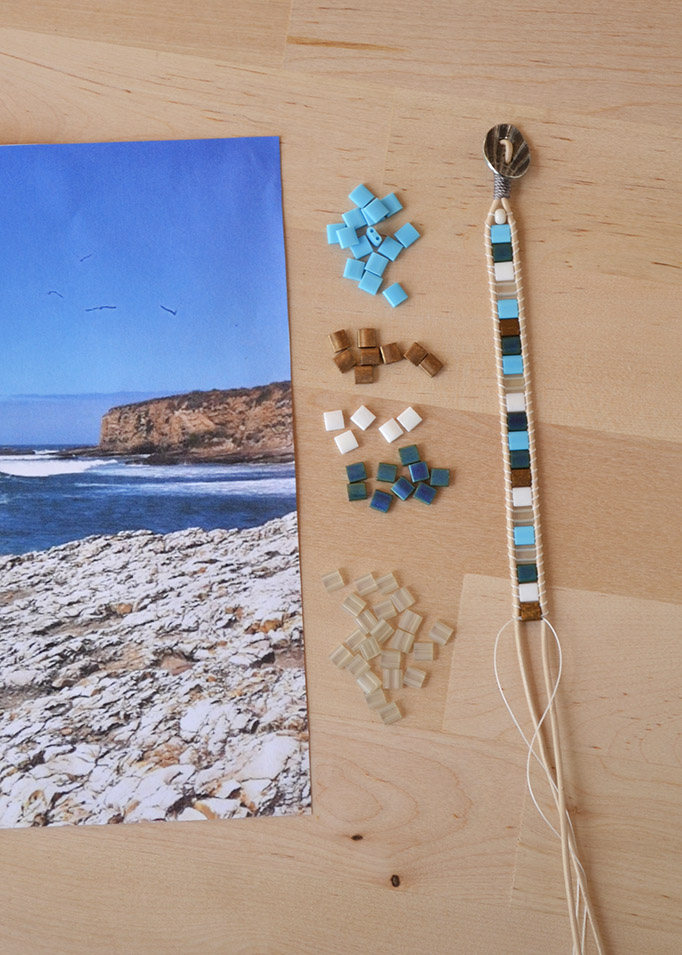
To celebrate, we've decided to bring you a sneak peek at what's to come! Below, you will find instructions to "Playa," a tribal laddered cuff that showcases our limited, but extremely fitting, Sand Cast Tribal beads. 
Since these beads were made in the 1950's, we cannot guarantee that they can be reordered again. However, this style of bracelet can be made using any barrel style bead that you treasure, as long as the holes are large enough to accommodate two passings of your Fine Weight C Lon. Please refer to our Tribal and Trade beads for more inspiration and ideas. Don't forget, you can certainly refer to our "Stackable Ladder Bracelet" Youtube video for detailed instructions on the laddering process. Free downloadable instructions can also be found by clicking here


Ingredients & Studio Essentials


 Let's Begin! 

First, you will need to successfully strap your project up to your design tray. We recommend reviewing our previous post on "how to set up a design board." 
Step 1 begins after the project is strapped up and ready to go...

* A Note on Measurements: The amount of material (beads, thread & leather cord) you will need for this project will vary depending on wrist size. Please measure your wrist, and use the following as a guideline: 
Length of 1.5mm leather cord: Wrist measurement x 2 plus an extra 6 inches. 
Length of 1.0mm leather cord: Cut 2 pieces, 12 inches in length for Silk Wraps. 
Length of C-Lon: 2-3 Yards for a single wrap bracelet (you will have extra left over)
Barrel Beads: 30+ (or less, depending on how long you want your bracelet to be)


Congratulations!

You have just completed the first of our fun Summer projects we created to honor the season. Make multiple versions using various colorful beads. Make one for your mom, dad, brother, boyfriend, girlfriend, best friend, or even your pet!

From all of us at Beadshop.com, we wish you a very happy, fun and creative Summer! Stay tuned for our upcoming full length video release of our "Summer Series."  


May 16, 2014

Project Update: Compadres and New Staff Member!

Some of you may have seen her signing your orders already, but we are so excited to give everyone an official introduction to our newest team member Savanna! You can get to know her by reading her biography on our About page.
The first thing everyone does when they arrive at beadshop.com is sit down and make one of our projects. Savanna, our new Inventory and Fulfillment Assistant, arrived at the company right when we launched our Compadres project and she just had to try it out. Her sample is named April, and you can find the ingredients for it here.
Clockwise from upper left: Sam, Savanna, Brittany and her puppy Clover, Karen, Janice, and Beckie
We are so thrilled about our new team member, and can not wait to see what other beautiful things she will create. Welcome Savanna!


May 8, 2014

Project Update: Kimono Cord Bracelets

When I first started at beadshop.com, we carried only a few patterns of Kimono cord. While I wasn't yet inspired to create, I was absolutely in love with the cord. I couldn't wait to come up with something to make; I just didn't know what. Of course we all know what happens when there is no concrete design settled in our minds: nothing. Lo and behold a whole six months had passed before we got in our new colors and still nothing had been made. Luckily my design block was solved when we received the new cord. I found myself inspired by the patterns like crazy! I was particularly drawn to what we now call "Garden--Adzuki Red." When I saw that cord I just couldn't wait to get started. Before it was even listed on the site I was off with it, my mind running around and full of ideas. Drawing inspiration from Nicole's use of jump rings in her 5 Stitch Wrap Bracelet, I set out to come up with a way to use them without overpowering the cord itself. Obviously it made sense to string them on, but in what way? Randomly thrown on? In groups? Both? In the end, after a bit of tinkering, I came up with the design you see here. While this is what I decided on, I would encourage you to have fun with it! Mix up the colors or spread the rings out. It will all look good and you'll end up with a beautiful bracelet no matter what!

May 1, 2014

Quick Tips: Palette from a Photograph


One of the first choices in any project is deciding on the colors. While this can be as simple as picking out your favorite blues or yellows, sometimes this basic task can seem nearly impossible. If this ever happens to you, it can be helpful to search for inspiration away from your bead stash. One of our favorite places to find this vision is from a photograph. It can be a beautiful scene that you can’t take your eyes off of or a treasured image of a loved one. Either way, using photographs to find inspiration is a wonderful way to help you get back on track.

Above is a photograph I took on a sunny day at the beach. It is one of my favorites because of the intensity and depth of color. The deep blue-green of the ocean looks so much like my favorite Tila Bead that I decided it would be a perfect anchor color in a Mosaic Wrap Bracelet. It is important to not only identify the key colors but to also note the balance of the colors. In this photograph, the main colors are the blue of the sky, the deep blue-green of the ocean, and the sandy-cream of the shore. The white caps of the waves and the gold of the distant cliffs are important too, but could be incorporated with less frequency to keep the balance of colors true to the photograph. Darker grays and browns can be seen on the shore.

Tila Beads: Opaque Turquoise Blue, Matte Metallic Gold, Matte Opaque White, Matte Metallic Blue Green, Transparent Oyster Luster  Leather: Sand 1.5mm  Laddering Thread: White Tuff #1  Silk Wrap Thread: Cocoa C-lon Button: Shell We Dance in Pewter

I used Tila Beads to capture the main colors in the photograph, as well as some of the highlights. Both the white and gold beads are used in smaller amounts as seen in the sample. To bring out the colors of the shore I chose Sand colored leather and Cocoa C-lon for the silk wrap. My last decision was to bring in some more highlights through the use of White Tuff Cord #1 as my laddering thread. While this is only one example, you can definitely see that the colors from this image have helped inspire the colors of the project. The next time you feel like you are in a creative rut, try finding inspiration through a photograph. As Janice tells her students, “Get the color right and the design will follow.”

Flash Sale Friday...get creative!

Last week Kate went shopping for some special strands at a local gem show, and she brought back six stone strands she couldn't live with...