Dec 10, 2014

New Project: Mosaic 4 Wrap Bracelet

 
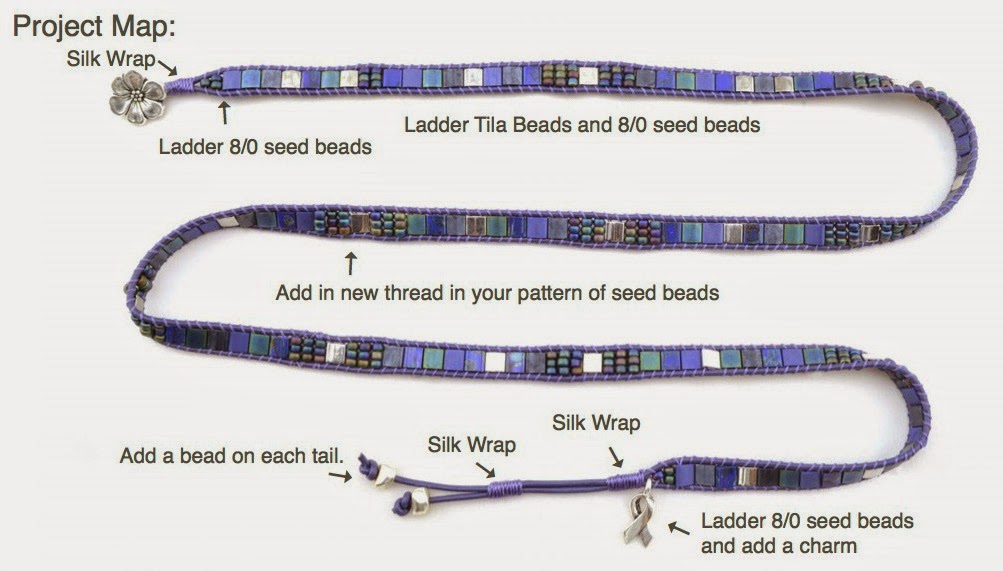
Mosaic 4 Wrap Bracelet
Based on Mosaic Wrap by Brittany Ketcham

The team at beadshop.com decided to build on Mosaic Wrap Bracelet, a fabulous design and video by Brittany Ketcham. We all wanted it except now as a 4 wrap. We all learned rather quickly that the required Tuff Cord to do a 4 wrap Tila Bead bracelet was too much to handle. So, we chose to add thread halfway through to make it easier.

Of course, you can find the video tutorial and complete handout at www.beadshop.com!


http://beadshop.com/projects/youtube-videos/mosaic-wrap-bracelet/

Ingredients List for Blue Ribbon Bracelet: 

2 yards Purple1.5mm Greek Leather (Sold in lengths of 4 or 5 yards)   
1 yard  Medium Purple C-Lon (sold by the spool) 
1 pkg Silver Pebbles metal beads


Studio Supplies:
Rat Tail
 Handy Tape
 Flush Cutters
Plastic Baggie to protect tray when gluing

http://beadshop.com/projects/youtube-videos/mosaic-wrap-bracelet/

http://beadshop.com/projects/youtube-videos/mosaic-wrap-bracelet/

In the video, Brittany asks you to cut your Tuff Cord 3.5 yards long for a 2 wrap bracelet. For a 4 wrap bracelet you need a total of 8 yards. We found it easiest to cut 2 pieces of Tuff Cord 4 yards in length and 1 piece of leather 2 yards long. You will add the second piece of Tuff Cord when you need it. For even an advanced jewelry maker, 8 yards of Tuff Cord is too much thread to manage.

http://beadshop.com/projects/youtube-videos/mosaic-wrap-bracelet/

 1. Thread the Tuff Cord through the button holes or shank to the middle of the Tuff Cord. 
Tie the Tuff Cord in an overhand knot close to the button.
http://beadshop.com/projects/youtube-videos/mosaic-wrap-bracelet/

 2. String your leather through the holes of the button or shank. Equal out the length of leather on each side of the button.
http://beadshop.com/projects/youtube-videos/mosaic-wrap-bracelet/

 3. Cut a length of C-Lon 18 inches long. Silk wrap over the leather and Tuff Cord close to the button at the beginning of your project. Silk Wrapping and using a Thread Burner* are demonstrated in the video. See also Skill Builder: How to Singe Using a Thread Zapper II for further instruction.

*Note: Thread Zapper II has replaced the Thread Burner, which we no longer carry.
http://beadshop.com/projects/youtube-videos/mosaic-wrap-bracelet/ 


4. Helpful Hint: Make self-needles of each end of Tuff Cord by adding a small amount of glue to the last inch. Run your finger along each cord spreading the glue towards the ends. Wait about a minute and use flush cutters to angle cut the ends. Repeat as needed.
http://beadshop.com/projects/youtube-videos/mosaic-wrap-bracelet/

5. Add one seed bead to your Tuff Cord strands as Brittany demonstrates in the video. Please review our Skill Builder: How to Ladder, if you need additional help.

We added in our new 4 Wrap samples, a second row of seed beads to help graduate to our first
 Tila Bead.
http://beadshop.com/projects/youtube-videos/mosaic-wrap-bracelet/

6. You can create any pattern you like with your Tila Beads. Remember these beads have two holes! It is easy to skip the second hole in one’s enthusiasm to get the next Tila Bead strung:)

Also, stay to the same direction of laddering your threads; if you go OVER and UNDER with your Tuff Cord, stay with that. It doesn’t hurt to have a post-it note nearby reminding you the way you weave around the leather. It could simply say:
OVER
UNDER
http://beadshop.com/projects/youtube-videos/mosaic-wrap-bracelet/

 7. Each sample will be as different as the person who created it.
The 8/0 beads can be laddered 2 beads tall or 3, it depends on your preference. 

http://beadshop.com/projects/youtube-videos/mosaic-wrap-bracelet/

 
8. In the Top Sample: 3 beads x 3 rows of ladder AND 2 beads x 2 rows of ladder were used. In the middle sample: 3 rows of seed beads were used to bookend the silver Tila Bead.
In the Top and Bottom Samples: the Tila Bead placement is the same pattern of 5 
repeated throughout.


http://beadshop.com/projects/youtube-videos/mosaic-wrap-bracelet/

9. Sometimes your project gets loose on the board. A helpful way of keeping it taut is to stand up your spool of C-Lon under the project and it instantly makes it tighter. If this won’t work, re-tie your project again.
http://beadshop.com/projects/youtube-videos/mosaic-wrap-bracelet/

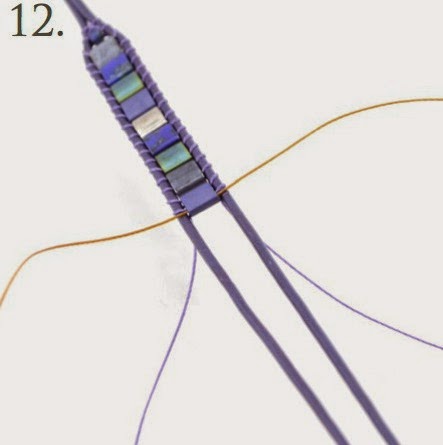
10. When you get close to completing 2 wraps, it will be time to add your new thread. Cut another length of Tuff Cord 4 yards long. We are demonstrating using Gold Tuff Cord #1 so you can see the old (purple) and new (gold) side-by-side below. Using a Big Eye Needle, thread your new cord.

http://beadshop.com/projects/youtube-videos/mosaic-wrap-bracelet/

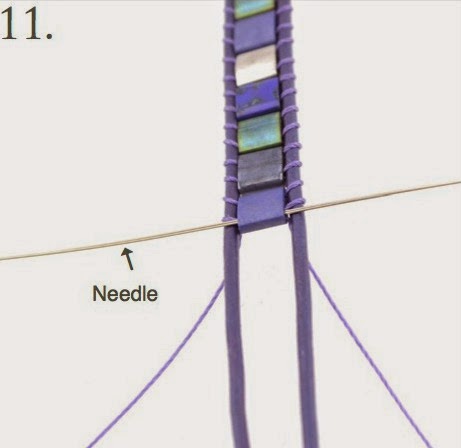
11. Thread your needle through the bottom hole of the last Tila Bead. Select a place where you will be adding rows of 8/0 seed beads, which have larger holes, which makes adding thread much easier.
http://beadshop.com/projects/youtube-videos/mosaic-wrap-bracelet/

12. Pull your new thread through almost to the halfway point.
http://beadshop.com/projects/youtube-videos/mosaic-wrap-bracelet/

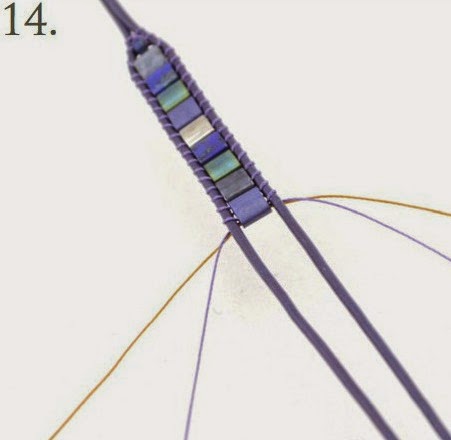
13. Add glue along the portion of cord that you will now pull into the center of the Tila Bead. This is very important! Don’t leave the glue out.
http://beadshop.com/projects/youtube-videos/mosaic-wrap-bracelet/

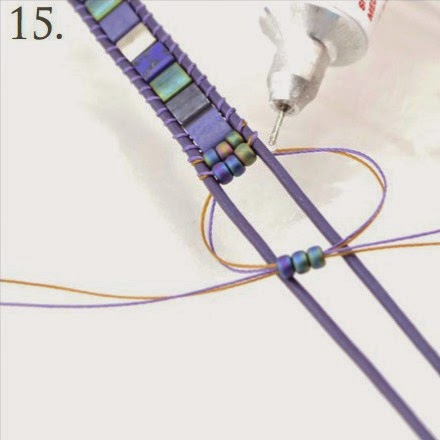
14. Pull your thread with glue into the center of the Tila Bead. Bring your new cord in place with the old. If you old cord goes UNDER, then bring the new one under as well. The two cords will be working in tandem to ladder the 8/0’s.
 
http://beadshop.com/projects/youtube-videos/mosaic-wrap-bracelet/

15. Ladder both threads together for several rows adding some glue onto the thread in the spot that will live inside the beads.
http://beadshop.com/projects/youtube-videos/mosaic-wrap-bracelet/

16. When you have “married” the old and new thread together for several rows, you are now ready to cut the old thread away on the back side.

http://beadshop.com/projects/youtube-videos/mosaic-wrap-bracelet/

17. Using flush cutters, carefully cut the old thread away. Any little bit you miss will more than likely disappear inside the row of beads.
http://beadshop.com/projects/youtube-videos/mosaic-wrap-bracelet/
 
18. Here is a fresh sample using just the purple cord for both old and new threads. 
It is hardly noticeable!

Continue to ladder until you are almost finished. 
Be sure to factor in the silk wrapping and button loop to your finished length.


http://beadshop.com/projects/youtube-videos/mosaic-wrap-bracelet/

19. When you are ready to close, graduate down your seed beads as you did when you started with a row of 2 and then 1.

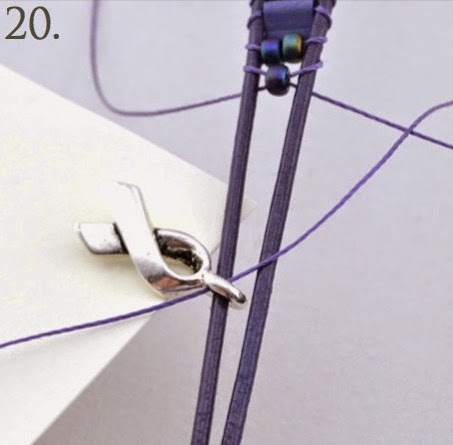
String your charm on one end of leather. Decide where you want the charm to live when it’s being worn. Trying the wrap on is important to help in this decision.
http://beadshop.com/projects/youtube-videos/mosaic-wrap-bracelet/

20. Thread the Tuff Cord through the loop of
 the charm.
http://beadshop.com/projects/youtube-videos/mosaic-wrap-bracelet/

21. Refer back to the video to see how Brittany ties her Tuff Cord multiple times around the leather. Add a drop of glue on the knots to secure them.

UNLIKE THE VIDEO….
We recommend NOT cutting the Tuff Cord at 
this time.*

We suggest you leave the excess tails of Tuff Cord with the leather. Run a bit of glue about 1/4 inch along the leather and Tuff Cord. Give the glue a few minutes to dry.

*We have all learned since making the video that leaving a bit of excess thread is a good precaution against unraveling knots. 
http://beadshop.com/projects/youtube-videos/mosaic-wrap-bracelet/

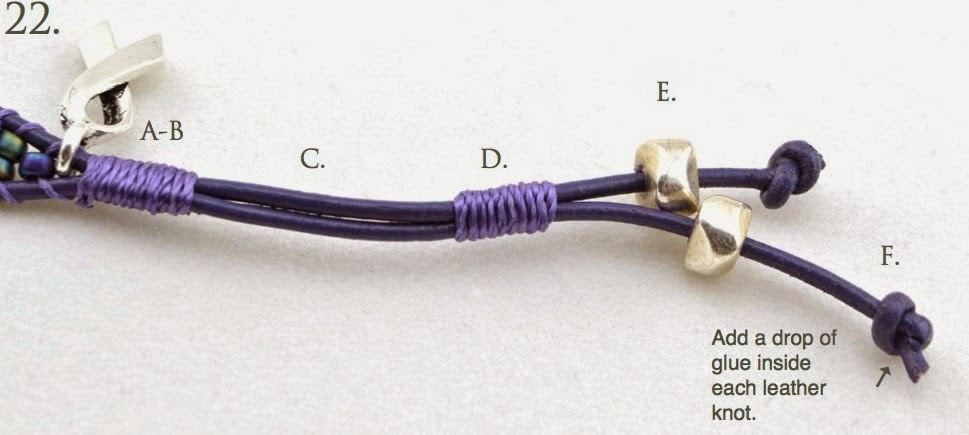
 22. A. Silk Wrap over the leather and Tuff Cord for about 10 wraps.
B. Singe the ends of the C-Lon.
C. Make a loop large enough for your button.
D. Repeat the Silk Wrap and Singeing the C-Lon.
E. Add the optional bead to each tail and make an overhand loop below them. We highly recommend adding a drop of glue in the center of the knots of leather.
F. Cut off excess leather with flush cutters.

We hope you have enjoyed the update to this wonderful project by Brittany Ketcham. Please let us know what you think. And always feel free to tell us how you are inspired.

Nov 21, 2014

New Skill Builders Section at Beadshop.com!

Working at beadshop.com means that we are lucky enough to spend time beading at the office. Thankfully, we get to do so under the wise eyes of expert beader, Janice Parsons. 

Our fount of knowledge.

Believe me, we all take full advantage of the opportunity to learn from her! Quite often, you will find one (or all) of us at her desk with a question about how to improve upon or master a specific technique. Of course, she always has the answer, and our skill sets improve almost immediately!

After realizing that many of the questions we ask Janice are also questions we hear from you, we have decided to create a section on our website devoted solely to skill building. There are many basic techniques that are often repeated in our project tutorials, and mastering them is so advantageous. 

For example, I can not tell you how many times I have accidentally burned through my macrame´ when attempting to singe a perfect finish with a Thread Zap II. Has that ever happened to you? Never fear, my fellow beader. We now have a tutorial devoted specifically to this process. How to Singe Your Cord Using a Thread Zap II is designed to help you to familiarize yourself with both the mechanics of the thread burner (a highly recommended Studio Essential) while also helping you perfectly singe the cord. 

Perfectly singed!


We have also created tutorials to help you Secure Your Project to a Board or perfect your laddering and macrame stitches. These techniques will serve you over and over again in your beading. We really hope that you love our new Skill Builders. Of course, we will be adding more to this page, so please let us know what you would like to see! 

As always, happy beading! 

Nov 4, 2014

Odyssey Bracelet by Janice Parsons


The Odyssey Bracelet uses Linen cord, which has been popular as a natural fiber for stringing beads for more than one hundred years. As you can see, this wrap can also be worn as as a necklace, or you can layer more than one. 

If this is your first time stringing with linen, our wish is for you to fall in love with the material! The following Step-by-Step guide is for the Black Sky variation of the bracelet, but is intended to be adaptable to all samples (plus any combination you dream up). We always recommended that you read it through prior to starting. 
This easy project was created to look luscious and expensive, but to actually cost very little. The ingredients can be purchased for under $25.00, making it the perfect project for holiday gift giving. Of course, you'll probably also want to make one for yourself!

Project Level: Beginner     
Time to Complete: Time to Complete: 3+ hours


Ingredients

Studio Essentials

Note: This project does NOT use glue or a thread burner.


Before cutting any linen or C-Lon, we need to determine how many strands of linen will fit through your button shank. Take one end of linen and weave it back and forth through the shank of the button. How many strands can you fit comfortably?
Once you have that number, set the button aside. You won’t need it again until the end of the project.

2.  Below is a chart of how many strands of linen to cut and what lengths to cut them based on the number you have determined. Take the number and divide it by 2. That new number tells you how many strands to cut. If you have number that won’t divide evenly by 2, drop down to the next number. Example: 7 strands will fit through but when you divide it by 2, it won’t divide evenly. So, you have to use 6 instead. 6 ÷ 2 = 3. You would cut 3 strands.

3.
NUMBER OF LINEN STRANDS THAT WILL FIT BUTTON SHANK:                             
CUT LINEN: 
NUMBER OF TIMES IT WILL WRAP: 
CUT FINE WEIGHT C-LON:
4-5
 2 X 120 INCHES
5*
2 X 36 INCHES
6-7
3 X 96 INCHES
4*
2 X 36 INCHES
8-9
4 x 72 inches
3*
2 X 36 INCHES
                                     10-11  
    5 X 72   inches
               3*
2 X 36 INCHES

Not every button shank has a generous opening which will fit multiple strands of linen. If that is the case with your button, to create a bracelet that looks abundant and juicy, you will have to add additional wraps around the wrist to give it the look pictured here.
So, now you are ready to cut your linen and C-Lon. Use a flush cutter or thread snips to cut based on your number. These measurements are intended for a 6-8 inch wrist. Add 12 inches to each strand you cut for a larger wrist.

Bring all the tails together so your strands are even. Fold them in half so you now have twice as many strands. You are ready to make your button loop. So get out a macramé board or other box with sides that you can use to stabilize your linen while you macramé.


A lightweight macramé board is really helpful, along with flush cutters. I prefer working on the backside of the board because I find the words and lines distracting. But, by all means, use the front side if you find it helpful.


Even out your linen and find the center of your strands. Secure them together to the top and bottom of the board so the linen feels pretty taught. A tube of beads or spool of thread can be inserted under the linen to help create space for easier macramé.

The steps to macramé are demonstrated with a heavier piece of scrap cord to clearly demonstrate the steps.
You will be following along with your Fine Weight C-Lon.


Just about a half inch above the center of the linen, tie an overhand knot with your C-Lon.
For demonstration purposes, I have used an easy-to-see heavier cord in aqua.


Take your right cord and create a loop over the linen and under your left cord.


Take your left cord and loop it under the linen and up over your right loop.


Gently but firmly pull the cord to tighten the knot.


Take your left cord and create a loop over the linen and under your right cord.


Take your right cord and loop it under the linen and up over your left loop. Gently but firmly tighten the knot. You have now completed your first square knot.


Start again on the right side making a loop as you did in Step 7. Continue alternating your knot from right to left.
If you forget where you left off, always look for the side with the loop on top; that is the side you will use to start your loop again.


Your goal is to macramé a button loop that will just fit your button but not be overly huge. So, after about 20 complete square knots, remove the project from the board and double check. Better be safe than sorry!


Once you have macraméd a loop the right length to accommodate your button, reattach the project to the board using your spare cord. Position the loop so the tails of the C-Lon are closest to the board (on the bottom section of linen). You are going to macramé around all your linen strings 3 complete square knots.


Separate out a linen strand on each side that is closest to each C-Lon tail.


Knot the linen and C-Lon on each side with an overhand knot.
Using your flush cutters, CAREFULLY cut away the C-Lon tail, not the linen.


Separate the rest of your linen strands and tie an overhand knot at the beginning of each one not too far away from the macramé. No need to measure…make them random looking. Notice for this wrap bracelet, there are now 10 strands. You may have less strands and more length to your linen, depending on what you cut to fit your button shank.

The only caution I have about knotting along the linen is that the knots do absorb a fair amount of length. So, please keep an eye on length as you bead and add knots; you want to make sure you can make your wrap as many times around your wrist as you would like.


Take a moment to separate the beads you are going to use in piles according to how many strands you have of linen.The actual piles don’t have to be equal, just close in quantity.

If you have an overstock supply of beads, you can skip this step.

Think about saving a few beads to use for the tassel. If you end up not having extras, the tassel looks good without beads.


Pick any strand to start with. String on a bead and tie an overhand knot after it.


Tighten the knot. Notice the knot is not up against the bead. In this project, your knots are going to random and uneven in spacing.


Now is the fun part; you get to just string and knot. Try to be “loose” in your planning of where you want the beads. If you have a long stretch with no beads, don’t worry…you can add more beads on other strands to help fill in the empty space. You can also just tie knots by themselves with no beads.

Allow yourself to journey with the beads and linen and explore where they take you!
Always keep in mind how many wraps you want to achieve and keep trying it on as you go. You can do one strand at a time or do them all a little bit at a time. It’s up to you!


As you string and knot, you always want to be aware of your finished length and how many times you want your bracelet to wrap. Keep trying it on every once in awhile to keep your finished length in mind.

When you do measure for total length, keep in mind your button will add about 1 inch to the length. After the last bead on each strand, tie an overhand knot fairly close to the last bead. You are now ready to add the button and macramé the finish.


Finally! Time to get out your button.
Start by threading your linen strands through the shank of your button. Allow a bit of plain linen on the bead side.
Using your scrap cord, reposition the project back on the macramé board.


As you did when making the macramé button loop, stack the linen so it goes high rather than wide. Position your second piece of C-Lon under your linen cords. Tie a square knot with your C-Lon around all the linen strands close to the button.
Macramé 3-4 complete knots. Separate out a piece of linen on each side closest to your C-Lon. 


As you did in Step 16 and 17, tie an overhand knot around one strand of linen and C-Lon on each side and with flush cutters, cut only the excess C-Lon. 


The tassel can be made with our without beads. Each strand starts with an overhand knot first. String on a bead, if you have it. Knot below the bead.
Repeat this to other strands. If you don’t have beads to string, you can just do the first knot on each strand.
Cut them the length you want them below the knots. Untwisting the linen strands gives it a bohemian look. You can certainly keep them untwisted, if that’s your preference.

We hope you have created something you will love for years to come! Please feel free to send photos and comments to info@beadshop.com. And if we can share your work here on The Bead Table, we will need your permission. So, let us know.


Flash Sale Friday...get creative!

Last week Kate went shopping for some special strands at a local gem show, and she brought back six stone strands she couldn't live with...