


Subscribe to The Bead Table
Dec 18, 2014
Dec 10, 2014
New Project: Mosaic 4 Wrap Bracelet
Mosaic 4 Wrap Bracelet
Based on Mosaic Wrap by Brittany Ketcham
The team at beadshop.com decided to build on Mosaic Wrap Bracelet, a fabulous design and video by Brittany Ketcham. We all wanted it except now as a 4 wrap. We all learned rather quickly that the required Tuff Cord to do a 4 wrap Tila Bead bracelet was too much to handle. So, we chose to add thread halfway through to make it easier.
Of course, you can find the video tutorial and complete handout at www.beadshop.com!

Ingredients List for Blue Ribbon Bracelet:
2 yards Purple1.5mm Greek Leather (Sold in lengths of 4 or 5 yards)
1 yard Medium Purple C-Lon (sold by the spool)
8 yards Purple Tuff Cord #1 (sold by the spool)
1 Tube each of Tila Beads in: Palladium Plated, Picasso Opaque Cobalt, Matte Metallic Blue Green, Matte Cobalt, and Matte Blue Grey
1 Tube 8/0 Matte Black AB Seed Beads
1 Apple Blossom Button
1 Tube each of Tila Beads in: Palladium Plated, Picasso Opaque Cobalt, Matte Metallic Blue Green, Matte Cobalt, and Matte Blue Grey
1 Tube 8/0 Matte Black AB Seed Beads
1 Apple Blossom Button
1 pkg Silver Pebbles metal beads
Studio Supplies:
1 Tube GS Hypo Tube Cement


In the video, Brittany asks you to cut your Tuff Cord 3.5 yards long for a 2 wrap bracelet. For a 4 wrap bracelet you need a total of 8 yards. We found it easiest to cut 2 pieces of Tuff Cord 4 yards in length and 1 piece of leather 2 yards long. You will add the second piece of Tuff Cord when you need it. For even an advanced jewelry maker, 8 yards of Tuff Cord is too much thread to manage.

1. Thread the Tuff Cord through the button holes or shank to the middle of the Tuff Cord.
Tie the Tuff Cord in an overhand knot close to the button.

2. String your leather through the holes of the button or shank. Equal out the length of leather on each side of the button.

3. Cut a length of C-Lon 18 inches long. Silk wrap over the leather and Tuff Cord close to the button at the beginning of your project. Silk Wrapping and using a Thread Burner* are demonstrated in the video. See also Skill Builder: How to Singe Using a Thread Zapper II for further instruction.
*Note: Thread Zapper II has replaced the Thread Burner, which we no longer carry.
*Note: Thread Zapper II has replaced the Thread Burner, which we no longer carry.

4. Helpful Hint: Make self-needles of each end of Tuff Cord by adding a small amount of glue to the last inch. Run your finger along each cord spreading the glue towards the ends. Wait about a minute and use flush cutters to angle cut the ends. Repeat as needed.

5. Add one seed bead to your Tuff Cord strands as Brittany demonstrates in the video. Please review our Skill Builder: How to Ladder, if you need additional help.
We added in our new 4 Wrap samples, a second row of seed beads to help graduate to our first
Tila Bead.

6. You can create any pattern you like with your Tila Beads. Remember these beads have two holes! It is easy to skip the second hole in one’s enthusiasm to get the next Tila Bead strung:)
Also, stay to the same direction of laddering your threads; if you go OVER and UNDER with your Tuff Cord, stay with that. It doesn’t hurt to have a post-it note nearby reminding you the way you weave around the leather. It could simply say:
OVER
UNDER
Also, stay to the same direction of laddering your threads; if you go OVER and UNDER with your Tuff Cord, stay with that. It doesn’t hurt to have a post-it note nearby reminding you the way you weave around the leather. It could simply say:
OVER
UNDER

7. Each sample will be as different as the person who created it.
The 8/0 beads can be laddered 2 beads tall or 3, it depends on your preference.
The 8/0 beads can be laddered 2 beads tall or 3, it depends on your preference.

8. In the Top Sample: 3 beads x 3 rows of ladder AND 2 beads x 2 rows of ladder were used. In the middle sample: 3 rows of seed beads were used to bookend the silver Tila Bead.
In the Top and Bottom Samples: the Tila Bead placement is the same pattern of 5
In the Top and Bottom Samples: the Tila Bead placement is the same pattern of 5
repeated throughout.

9. Sometimes your project gets loose on the board. A helpful way of keeping it taut is to stand up your spool of C-Lon under the project and it instantly makes it tighter. If this won’t work, re-tie your project again.

10. When you get close to completing 2 wraps, it will be time to add your new thread. Cut another length of Tuff Cord 4 yards long. We are demonstrating using Gold Tuff Cord #1 so you can see the old (purple) and new (gold) side-by-side below. Using a Big Eye Needle, thread your new cord.
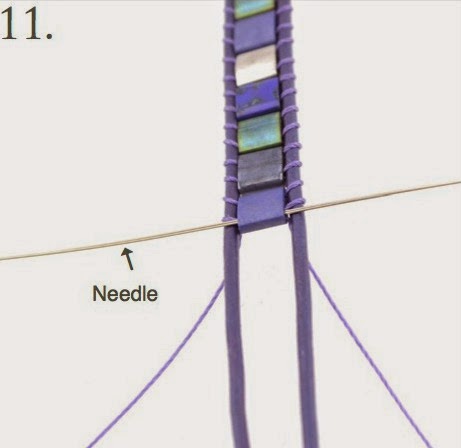
11. Thread your needle through the bottom hole of the last Tila Bead. Select a place where you will be adding rows of 8/0 seed beads, which have larger holes, which makes adding thread much easier.
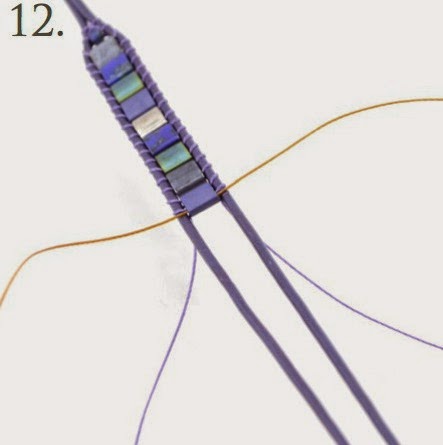
12. Pull your new thread through almost to the halfway point.

13. Add glue along the portion of cord that you will now pull into the center of the Tila Bead. This is very important! Don’t leave the glue out.
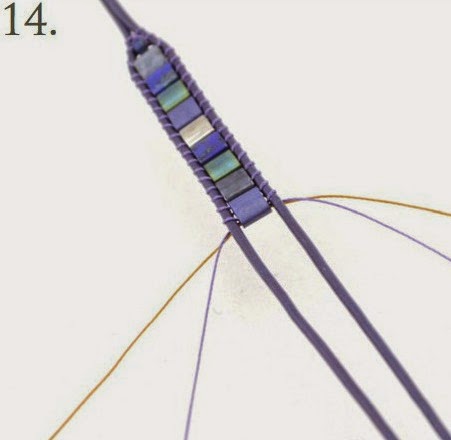
14. Pull your thread with glue into the center of the Tila Bead. Bring your new cord in place with the old. If you old cord goes UNDER, then bring the new one under as well. The two cords will be working in tandem to ladder the 8/0’s.
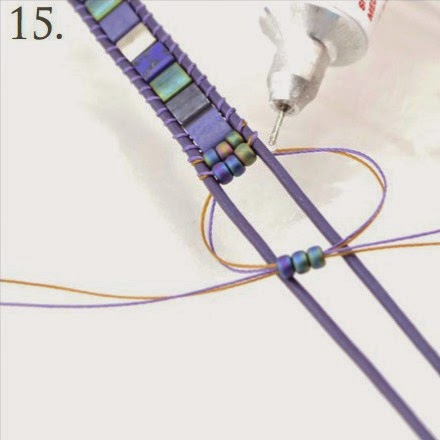
15. Ladder both threads together for several rows adding some glue onto the thread in the spot that will live inside the beads.

16. When you have “married” the old and new thread together for several rows, you are now ready to cut the old thread away on the back side.

17. Using flush cutters, carefully cut the old thread away. Any little bit you miss will more than likely disappear inside the row of beads.

18. Here is a fresh sample using just the purple cord for both old and new threads.
It is hardly noticeable!
Continue to ladder until you are almost finished.
Continue to ladder until you are almost finished.
Be sure to factor in the silk wrapping and button loop to your finished length.

19. When you are ready to close, graduate down your seed beads as you did when you started with a row of 2 and then 1.
String your charm on one end of leather. Decide where you want the charm to live when it’s being worn. Trying the wrap on is important to help in this decision.
String your charm on one end of leather. Decide where you want the charm to live when it’s being worn. Trying the wrap on is important to help in this decision.
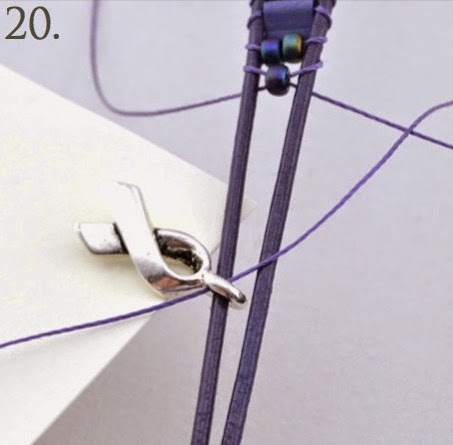
20. Thread the Tuff Cord through the loop of
the charm.

21. Refer back to the video to see how Brittany ties her Tuff Cord multiple times around the leather. Add a drop of glue on the knots to secure them.
UNLIKE THE VIDEO….
We recommend NOT cutting the Tuff Cord at
UNLIKE THE VIDEO….
We recommend NOT cutting the Tuff Cord at
this time.*
We suggest you leave the excess tails of Tuff Cord with the leather. Run a bit of glue about 1/4 inch along the leather and Tuff Cord. Give the glue a few minutes to dry.
*We have all learned since making the video that leaving a bit of excess thread is a good precaution against unraveling knots.
We suggest you leave the excess tails of Tuff Cord with the leather. Run a bit of glue about 1/4 inch along the leather and Tuff Cord. Give the glue a few minutes to dry.
*We have all learned since making the video that leaving a bit of excess thread is a good precaution against unraveling knots.
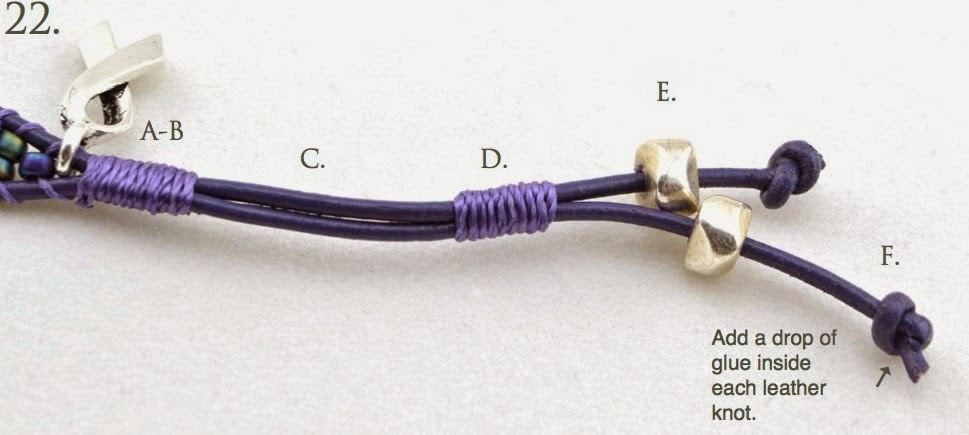
22. A. Silk Wrap over the leather and Tuff Cord for about 10 wraps.
B. Singe the ends of the C-Lon.
C. Make a loop large enough for your button.
D. Repeat the Silk Wrap and Singeing the C-Lon.
E. Add the optional bead to each tail and make an overhand loop below them. We highly recommend adding a drop of glue in the center of the knots of leather.
F. Cut off excess leather with flush cutters.
We hope you have enjoyed the update to this wonderful project by Brittany Ketcham. Please let us know what you think. And always feel free to tell us how you are inspired.
Dec 5, 2014

Subscribe to:
Posts (Atom)
Flash Sale Friday...get creative!
Last week Kate went shopping for some special strands at a local gem show, and she brought back six stone strands she couldn't live with...
