Aug 5, 2016

New Half Tila Beads

Beadshop is celebrating the new Half Tila beads from Miyuki of Japan. Think of Half Tila beads as the little sister to Full-size Tilas. They still have two holes and work wonderfully for beadweaving, but at 5 x 2.3 x 1.9mm, they are half the size and capable of patterning, like Herringbone. Below you can see the Full-size (top) versus the Half-size Tila Beads (bottom).


The smaller beads help create a more delicate and intricate look to your finished jewelry, but they can be a bit more challenging for a beginner beader. Thankfully, the holes are the same as full Tilas (0.8mm), so you can ladder with Tuff Cord #1 and beadweave multiple passes with Hana Thread or KO and a Size 10 Beadsmith needle

In the Pathways project, Linnea Lortsher has creatively adapted the herringbone weave to three colorways, giving the reader choices in what to choose to weave: 

1. Perfect Day in all one color shows off the beauty of the Half Tila without any distractions. It's just really elegant in any color you choose.
Perfect Day by Linnea Lortsher
2. Native Grass features two contrasting colors that highlight both the pattern and the opposite attraction of a matted-finish and a shiny Half Tila next to each other.
Native Grass by Linnea Lortsher
3: Deep Sea features two colors close together on the spectrum, which creates harmony.  
Deep Sea by Linnea Lortsher
In this boldly-colored design, Surf 'n Turf by Beckie TenEyck, the Half Tilas are able to dot their way along the design for more interest. Inspired by Mosaic 4 Wrap, Beckie chose a leather and Tuff Cord in the same color so they won't compete with the beads for attention.
We hope you will enjoy the Pathways handout, the project maps, and find this new bead from Miyuki as much fun as we do. Celebrate along with us as you weave and ladder some beautiful beaded jewelry!

Jul 30, 2016

New Version of Poetry to Inspire Creativity...

Just recently, four new colorways have been added to one of our most popular projects. This easy project uses simple macramé techniques to create a wrap bracelet that can both embellish your wrist or be worn as a necklace. It's so simple with just beads spaced within the knotted cord. 


Download the free, 16-page project handout that has both the original instructions and the new addition, which includes the four new color palettes. A list of ingredients is included. Tools and valuable Project Maps are also available on the website.


With the new samples, Janice demonstrates how to adapt the design to include a 2-hole button, which is more available than the single-hole pearl closure used in the earlier samples. "It's challenging to source anything unusual like that lovely pearl button, so I wanted to make sure the project would continue on with a button anyone could find." Janice chose 2-hole buttons in mother-of-pearl, but you could use almost any button. "I wouldn't recommend a shank button; I think the cord will have excess wear along the shank and wear out more quickly. However, a 2-hole button is a good choice." 


Beach Memories designed by Deana Paul
While Janice Parsons developed the bead recipe for four of the new designs, there is a fifth entitled “Beach Memories,” which was designed by a member of our beading community, Deana Paul. Her beautiful creation was selected for Beader Showcase, Beadshop's platform for our readers to share their designs inspired by our online projects. Deana’s color combination of white, aqua, silver, and turquoise was inspired by the Pacific Ocean. In fact, she doesn’t live far from Catalina Island, and as she explains it, she “wanted the bracelet to have a beachy feel.” 


The final length of your “Poetry” jewelry piece is up to you. According to the handout, around 40 to 46.5 inches is recommended for 6 to 7 wraps. The more wraps you want, the longer you can make it. If you’d rather wear it as a necklace, wear it long, double it, or add a focal pendant. The versatility of this design is up to you! 


Jul 27, 2016

Look Hot with a New Take on Cool Wrap Bracelets


Roll up your sleeves because the heat is on! At least, that’s the case with the weather in many parts of the world as summer temperatures continue to climb. Hot weather also means you’ve put away the turtlenecks and pulled out the tank tops. Warmer weather usually means showing off a little more skin, and wrap bracelets are a great way to adorn yourself… and they make great gifts! They add a pop of color to an outfit, or you can choose neutral tones that will go with everything. Beadshop’s Prairie Wrap Bracelets let you combine colors and add your favorite slider charms to create unique jewelry. 

If you are ready to make one right now, there is already a large selection of designs to pick:

  • Desert Lavender” mixes shades of purple and focal center piece feather and heart sliders.
  • Country” has star slider charms, blue leather, and rose and marigold fiber.
  • Prickly Pear” can’t be missed with bright shades of pink and silver slider charms.

And there are many other designs to choose from; each sample includes a complete list of ingredients that goes along with the free, 15-page handout, which is easy to download. This is such a fun project that uses basic macramé techniques and simple gluing. It’s a breeze and intended for all levels. Just follow along and before you know it, you’ll forget all about that summer heat! 


Jul 21, 2016


Stretch Therapy is not just for women.....

Look for the bead from 2002, when we celebrated 20 years of The Bead Shop of Palo Alto.


Finally, thanks to Johnny Depp, the moment for men’s jewelry has arrived! No more lurking in the shadows or being the only guy you know who wears jewelry….Now it’s a huge trend. Make bracelets for the man in your life…or, Guys, you can make them too! It’s okay to wear a wrist of embellishment and not feel weird.


Our newest project, Stretch Therapy is on it's way to being this summer's hit. Each stretchie takes less than 30 minutes to make and they make great gifts. The handout will take you through step-by-step how to add tassels, charms, tie a secure knot and more...
and best of all, it's free!


We'd love to see what you do with Stretch Therapy. 
Please send your pix to info@beadshop.com 
and we may post your creations on Beader Showcase


Happy beading!
~janice


Apr 25, 2016

When Is it Okay to Copy?

    We get asked a lot about our policies around copying our samples or using our handouts by teachers for use in class settings. This post isn't an in-depth explanation of copyright law as I'm not an attorney and I'm also not an expert! I can only speak to how we feel at beadshop.com about our designs and intellectual property. Hopefully I can answer most of your questions about what we think are good guidelines for use of our designs. If there is enough interest, we will create an area just for those interested in teaching with our handouts and videos. For now, I'd like to just focus on when is it okay to copy our jewelry samples?

The Mona Lisa by Leonardo Da Vinci 
Imagine you are an art student and you go to a museum and set up an easel and paint a masterpiece like the Mona Lisa, by Leonardo da Vinci. It is a commonly-held belief that when you're learning to paint, it's okay to copy as you study the techniques, the style, the colors. You're not attempting to forge a copy of the painting and sell it as an original. (That would get you arrested!)

At beadshop, our expectation (and we think yours) is that you want to copy our designs when you're learning to bead. We give you project maps, learning materials, videos, skill builders, lists of ingredients and even offer kits for sale that encourage you to mimic the samples we create. We know the best way to learn beading is often by doing step-by-step with very specific ingredients and samples for you to replicate. And you are welcome to copy as many times as you want. But....if you are making them to sell them, than copying is not okay. 


Beaders are like leaves...no two are alike.
I can't tell you to the fraction how much you need to change a design for it not to be a copy. Some say 10%. I find it hard to measure creativity in percentages. Again, I think it's common sense. Does it look different enough? If the answer is no, then you need to change it. And we believe strongly, in fact it's one of our core values, that each person has a unique, creative voice, no two are alike. After 30+ years teaching jewelrymaking,  I am positive you don't need to copy to be successful. 


When it comes to creating your own look inspired by one of our projects, Poetry is an excellent example of a project that will demonstrate the guidelines for what to do. Here's how the project was developed:

Poetry in Pearls by Janice Parsons. Poetry in Pink by Sarah Runco. Poetry in Grey by Karen Marshall. www.beadshop.com

I was in a yoga class and saw a bracelet on someone and I fell in love. I never got up close to it but noticed pearls were separated by thread and it wrapped multiple times around her wrist. I went back to my studio and sketched what I wanted to do. I had several macramé designs and handouts I had done that gave me the confidence that I was creating something I could put my name on. I also scoured the internet to see if I could find anything that mimic'd what I wanted to do. Nothing. So, through trial and error, I found the right weight thread (Tuff Cord #1) to use with our freshwater pearls and sourced a pearl button. We were selling the charm already by JBB and thought it would make a special, finishing touch. I macraméd the Poetry in Pearls sample and Grace Noland photographed it. Grace also created her own sample, Poetry in GreenI wrote the handout to guide everyone through step-by-step and we made kits up with all the ingredients. Then Sarah Runco and Karen Marshall interpreted the project in beads and colors they hand-selected.  

It's often hard to follow the trail of originality in jewelrymaking. We all have access to beads and supplies commonly available for purchase. Unless you have designed a unique clasp, cast your own beads, or own the only molds available for pressed glass beads, most of the ingredients are not protected by copyright laws (but, again, I'm not an expert!). However, our photographic images, written instructional handouts, project videos and the samples for those project form an umbrella of intellectual property which is protected by law. They cannot be reproduced without our written permission and consent of our artists. 

I hope you use common sense when finding inspiration from our talented designers, their samples and our learning. And that you give credit to our artists and beadshop.com where appropriate when and if you decide to sell your jewelry. Again, please use your best judgement and ask yourself, "would I want someone doing this with my designs?" You'll probably never go wrong if you use the Golden Rule.  

I am more than happy to talk with you about your questions and concerns. Please don't hesitate contacting me.

Happy beading!
~janice


Mar 7, 2016

Very clever! Backstrap Weaving for Macramé


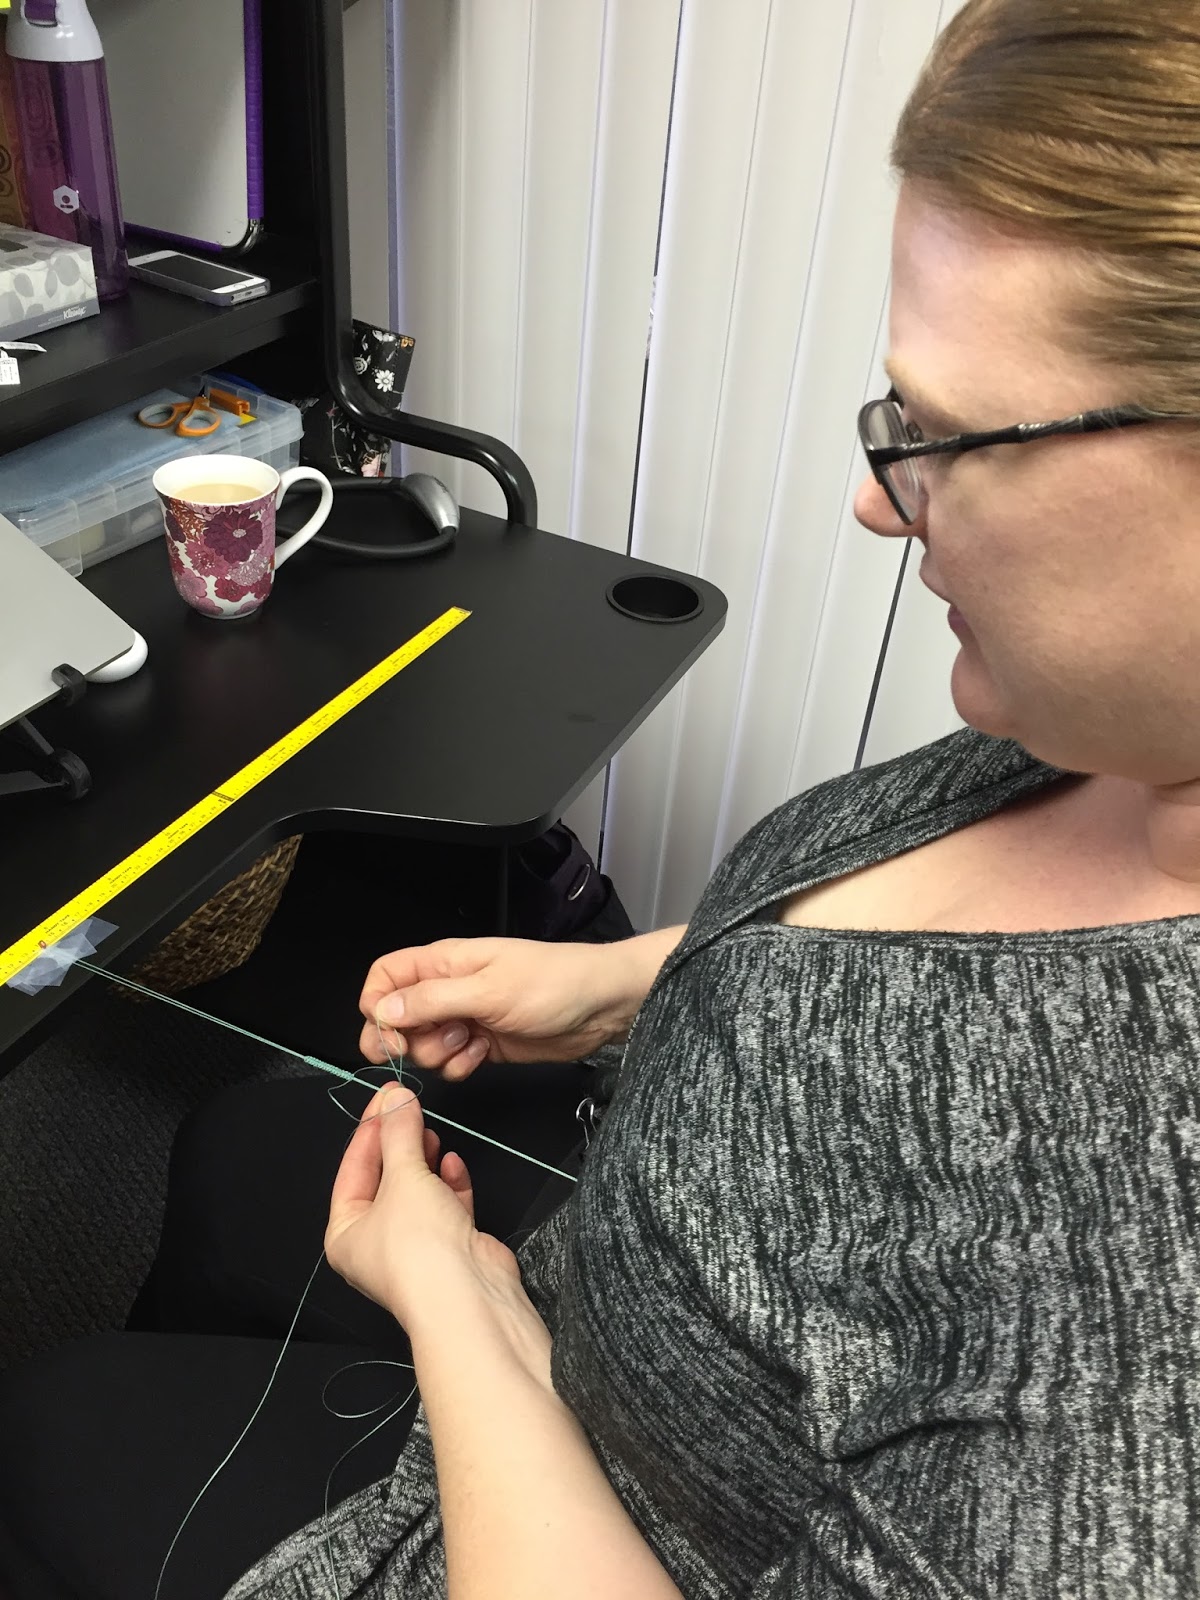
When I came into the office this morning, I spotted Linnea finishing up the handout and samples for Pathways, a new Herringbone Stitch Project to be released at the end of the week. We're so excited about it but what really got me going was the way Linnea had secured the C-Lon cord to her waist to macramé. When I asked her what she was doing,she said she had modified a technique known as "backstrap weaving"; a style of looming used today by the Maya in Guatamala, where you strap the loom around your waist on one end and secure it to something on the other. I thought it was so ingenious. Linnea was taught by her mother, Hilary, who is an avid crafter. "My mother raised me to sew from age 4 and taught me about weaving, women's works and how to be historically correct." 
Linnea has secured the cord to the desk and to her waist with a binder clip. This gives her the tension to macramé with ease. I love it! It's so simple and perfect for the button loop. Thank you, Linnea and Hilary!


First Samples Made for Pathways Herringbone Project

Mar 1, 2016

The All-Star Instructor Cast from the Past....

Sampling of Class Handouts from The Bead Shop

I love what we're doing now with projects and design, but I also am so grateful that we can look back at what we accomplished as artists and designers when The Bead Shop was in its heyday and the early days of beadshop.com....

When The Bead Shop of Palo Alto was going full steam (and it did for close to 28 years), the classes taught by outstanding instructors were well-beyond what anyone else was doing. I mean that honestly and I can't take credit for it. The team of staff and outside teachers were perfection. I know when I start listing some, I will forget others, but there are a few that stand out for taking risks, pushing both the envelope and me to offer the best in learning. I want to thank:
Kate Ferrant Richbourg, Brittany Ketcham*, Kriss Silva, Mel McCabe, Tom McCabe, Irina Serbina, Randi Samuels, Vicky Ngyuen, Nicole Anderson*, Iris Sandkühler, Leah Fairbanks, just to name a few of this all-star roster who made The Bead Shop the place to learn beading, bead making and jewelrymaking. 

And now we are finally finally finding the time** to post online many of the handouts that were created by instructors while they were employees. It's amazing to think how many of today's top teachers and leaders in our industry passed through the doors of that little shop. So, please enjoy the learning. It's all free to download and we'll be posting more as time permits.  ~janice

* Many, many of the most amazing projects and designs on beadshop.com today were done by Brittany Ketcham and Nicole Anderson.
** And a big "thank you" to Karen Marshall, Web Master @ beadshop.com for finding the time and bandwidth to get this project completed.

Flash Sale Friday...get creative!

Last week Kate went shopping for some special strands at a local gem show, and she brought back six stone strands she couldn't live with...